Fall 2021 ︎︎︎ SUNY Purchase ︎︎︎ (DES3090) Interactive & Experience Design
knitting Circle: PYthon + CPX pt.2, debugging, more ifs & switches
Background
For this next set of stuff we’ll talk about how to debug code that may not be working and getting used to the idiosyncracies of the CPX and Mu there. We’ll also talk about more complicated if/else statements, using the capacative touch sensors on the CPX and using it as an HID or “Human Interface Device” (basically a keyboard or a mouse). A (de)Bug’s Life
Inevitably, when you write code, you will goof stuff up. Joseph Campbell, the comparative mythologist (I highly recommend The Hero with a Thousand Faces if you haven’t read it), and warm, probably Werther’s-having grampa, once said that “computers are like Old Testament Gods, all rules and no mercy.” That can feel mostly true. Python does try to help you but you will encounter issues. How do you get around them? You know he’s got a Werther’s tho.
First, if something is not working, use the “check” button in Mu. It is the one that looks like a thumbs up.

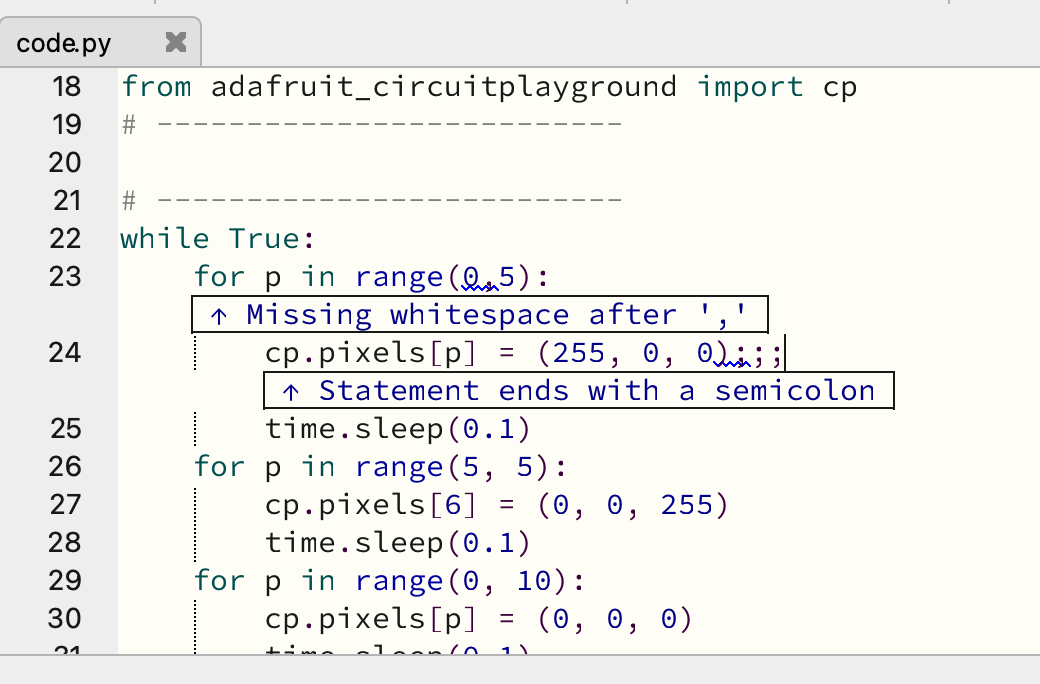
The first comment the check creates is simply a warning or recommendation. The second added text is an actual error that causes the code to not run.
The other issue that you will have is your code will be running, and then the CPX will turn off (if you wanted there to be lights, they may turn off for example). This is probably because there was an error that could only be determined as the CPX was running. That’s because the CPX is doing what is called interpreting the code rather than compiling it. You don’t really need to know what this means other than that the lil computer brain inside the CPX, is processing the code “live” and won’t always see every issue beforehand.
Here’s an example. Take our for loop code from last time, and modify it so that instead of to 10, the loop goes to 11. The CPX should stop running.︎︎︎
If you press the button that says “serial” the CPX is telling us (through the USB cable) that something is wrong. The button will open a “console” with text.

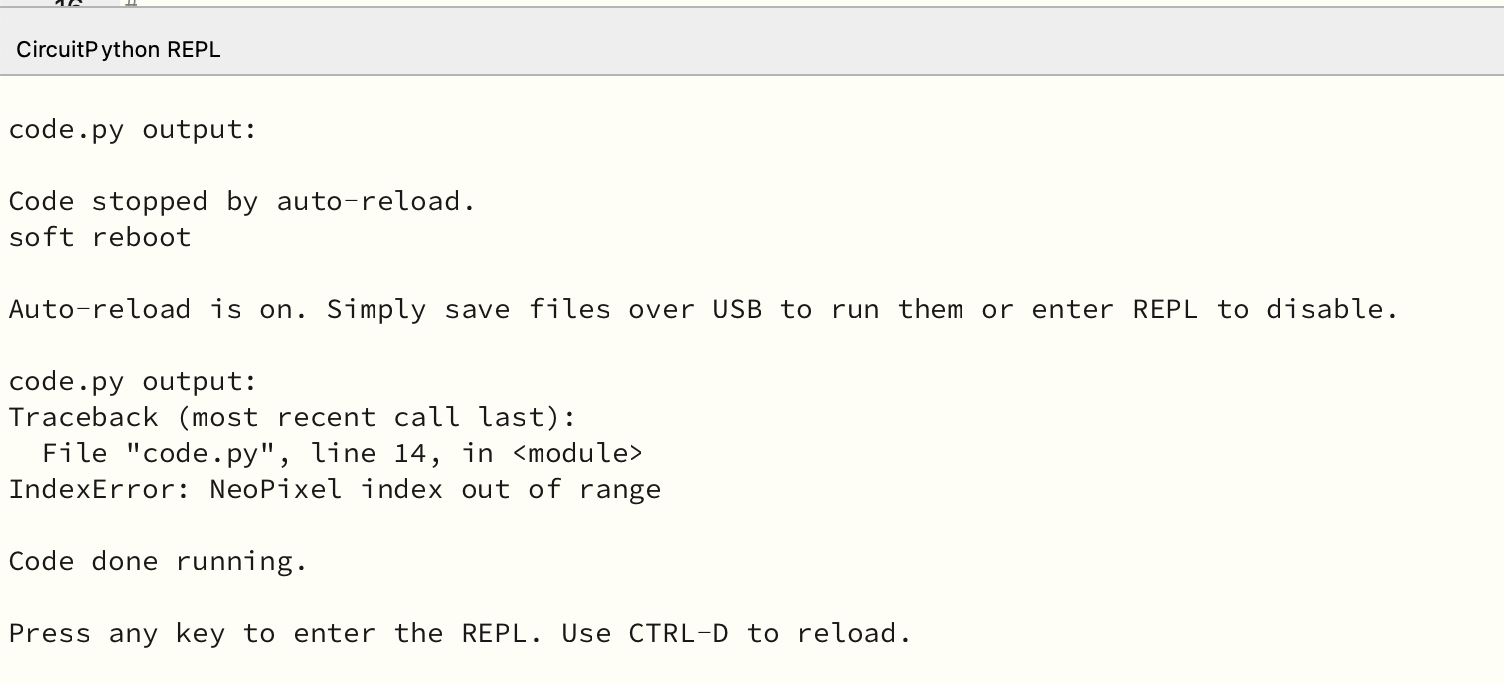
(You may need to quickly change something, change it back and then save the code to get the CPX to reset with the console open. Pressing the reset button or unplugging and re-plugging the CPX seems to make the console go away for me.)
You can also use the serial console to send messages you create to it. If you’re trying to figure out why something isn’t working, you may want to put a print statement to see what a variable is, or to just see that the code “got” somewhere. Take this example code, it is not doing what we want it to do, but nothing is “wrong” with it per se. It displays no errors. We want it to turn on one half of the pixels red, the other blue, turn them all off, and then repeat the process. But it is not doing that. Look at the print statements and see where the code is getting to and why it is “wrong.” ︎︎︎
We could also use this if we get confused about whether something is “zero-indexed” or not. That is, when the values start with zero instead of one. Here’s another “incorrect example” of code utilizing the for loop. This time however, we are using print statements to see which neopixel is lighting up. We put the “p” variable directly into the print statement.︎︎︎
Getting on the Elif-tical
In our previous examples we looked at if’s and else’s there’s something you can do inbetween these. “elif” which means “else if” that is to say “if another condition is true, do this.” This comes into play if we want to track if button a is pressed, button b is pressed or both are pressed. That is four states: - button a is pressed, button b is not pressed
- button b is pressed, button a is not pressed
- button a and button b are pressed
- no buttons are pressed
If we want to check multiple conditions in one “if” or “elif” we can use “and” to bring those checks together. If we want to check if something is False, we can use “not.” Here’s one way it might look if we use if/elif/else to check the conditions above︎︎︎
Just to make it clear, you can have any number of elif’s for example if you have to do something with 100 neopixels. Here’s an example with a huge if/elif/else statement︎︎︎
That’s Cap!
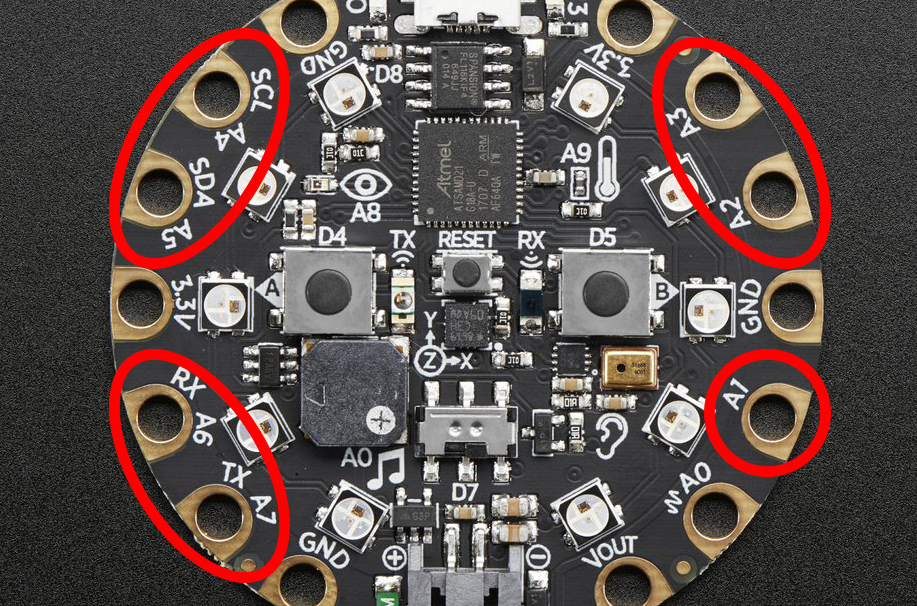
The code to use them is pretty simple. This will simply detect whether you are touching the sensor or not.︎︎︎
To utilize the alligator clips with your hand, or some conductive object like play-doh or a fruit you just clip it to the desired “port”/hole on the CPX and then affix it to the object. The CPX may not work as expected (for example the lights may simply stay on if you are using the cap sensors to light up the neopixels). The fix for this is, if you press the reset button, the cap sensors will calibrate on start up. Start in what you want to be the “off position” (ie nothing touching the desired object) and then reset.
Major Key (boards, and mice, and consumer controls).
The CPX can function, because it connects through USB, as what is called a Human Interface Device or HID. This allows it to appear (to our computer) as a keyboard, or a mouse, or what are called “consumer controls” (the play or pause buttons for controlling media which is a good way to “fake” playing audio with the CPX). I’m basically taking the examples for the keyboard and consumer controls from this page︎ and the examples for the mouse from this page︎
The reason I am linking those pages is because you basically need specific imports to utilize this functionality. You need to know less about the imports, but know that you need specific “keycodes” to reference, for example keys that are not alphanumeric. Those are listed here︎
You can also send multiple key presses to, for example, send a message︎︎︎
Here’s the consumer control code. If you have a YouTube video open and the window is “in focus” (selected) the consumer controls should cause the video to play and pause if you use that option.︎︎︎
Here’s an example with moving the mouse, using the accelerometer or tilt control on the CPX. Note that the location is relative to the mouse’s original position.
The accelerometer works with the cpx.acceleration tuple. It has x, y, and z values, but we access x with cpx.acceleration[0] and cpx.acceleration[1], similar to how we talked to the neopixels.︎︎︎