Spring 2023 ︎︎︎Purchase College, SUNY
︎︎︎
(DES2460)DMD2
Knitting Circle:
Easing & Parents
(AE pt.3)
Background
We’re now at a point where peoples’ concerns skill wise seem to be starting to diverge. Specifically we’ll talk about easing and parenting; two things that are extremely useful for your After Effects workflow. Additionally, I will link some resources for other skills you may want to understand. Some of these we will go over in class, but you may want to get the “jump” on so to speak. What is easing?
When you create two keyframes, by default, the computer simply asks, “how far apart are the keyframes in time and how much does the value have to change?” Then it will divide this transformation (be it position, scale, rotation, opacity, the value of an effect, etc.) evenly within that time. This is what is called linear interpolation. That is to say, the acceleration and speed do not change, so therefore the graph of those values is a straight line. This type of motion often looks very “digital” and inorganic. This might be desirable, but is often not what you are looking for.
Easing means to change the values by speeding up or slowing down at different points in order to create motion that is usually meant to be more natural looking. This might be for example, to make it look like a ball is rolling and coming to a stop. It would start fast and then slow down. This would be “easing in” to the second keyframe.
Why is easing?
As stated above, easing is used to give your key framing more subtlety and expressiveness. In (handdrawn) animation this is one of the principles of animation referred to as “slow in and slow out” though it relates to other ideas like “follow through.” It also generally makes your work more professional.How is easing?
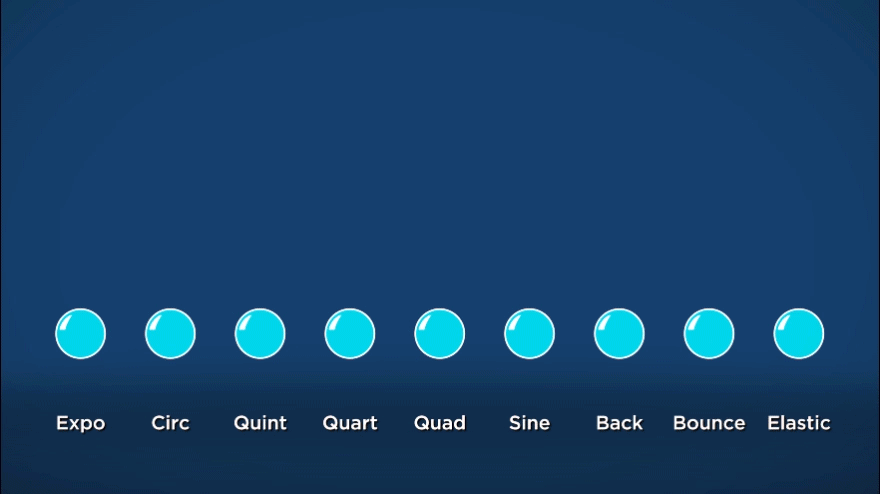
There are several ways to achieve easing. Some are default to AE and some are plugins which I will mention, however they are not all free. Easy Ease ︎︎︎ This is built into After Effects. If you have multiple keyframes selected, you simply right click and choose easy ease in, easy ease out, or easy ease. You can also use keyboard shortcuts, F9 will do easy ease. This will change the shape of the keyframe if you did it correctly (the shape will depend upon which option you chose). You will notice the motion will then be slightly smoother. Generally, I find this helpful, but oftentimes barely perceptible or lacking “character.”
Graph Editor ︎︎︎ This is also built into After Effects and gives you the most precise control over all your points. You select Speed Graph in your project window and instead of simply viewing the keyframes, you can see the change in speed between them. You can manipulate these shapes like bezier curves in Illustrator. The severity of the curve indicates the severity in the change in value between the two points.
Ease ’n’ Wizz︎︎︎ This is a plugin for After Effects. It is effectively free (it is pay as you wish). You can find it here. This uses what are called “expressions” or code in order to create the interpolation between two keyframes. Generally this is pretty fast, as you simply select the kind of easing you want from a menu. It also has the ability to do dynamic patterns of movement like bouncing.
Motion ︎︎︎This is a plugin for After Effects that is not free. It can be found here. However, the quality-of-life improvement is, to me, extremely worth it. It simplifies the process of keyframe interpolation but also has a bunch of other abilities that I don’t take full advantage of that are great.
What is parenting?
Parenting is a way in After Effects that you can link the behaviors of multiple objects together. This linking allows you achieve effects like simple machines or Inverse or Forward Kinematics. Why is parenting?
Some of you have seen this already, but if you want to create something like a character, or a simple machine, where parts need to work together (ie lower arm is connected to upper arm, which is connected to torso, etc). They should be “stuck” together to appear like a cohesive form. Other times, for a transition it may make more sense to link multiple objects to something called a “null” rather than copy-and-paste keyframes 10+ times.How is parenting?
Parenting requires the usage of a feature in After Effects called “the pick whip” It looks like a little swirly doodad on each layer. All properties (transformations, values of effects, etc) in a given layer also have their own pick whips. To use the pick whip, you click the swirly symbol, and then drag it to another layer. The layer you drag from is the “parent” and the layer you drag to is the “child” because it “inherits” the behavior of the parent. This is the origin of the term.
When you “pick whip” or parent one layer to another it will absorb most of the transformation properties of the parent. It will absorb scaling, rotation, and position. It will not absorb the effects of the parent layer, and it will not absorb opacity. If you are linking one composition to another, anything inside the original composition will not automatically be inherited by the child. One parent can have multiple children, and “grandchildren” will inherit the properties of both generations.
If you want to pick whip a specific property you simply twirl down to it and link it to the property of the child layer. This is usually for example, to parent the opacity of one layer to other layers, though you have no obligation to do this. You could parent opacity to scale for example. It doesn’t mean it will be interesting, or worthwhile necessarily, but you can do it and there may be edge cases where you want to do it.
The other thing you need in order to understand parenting is nulls. Nulls are layers with no content, only keyframes. You parent to those layers for things like transitions, or if multiple objects need to have the same movement; for example something like planets around a sun.
The last thing to keep in mind is anchor points. Rotation in particular will happen around an anchor point. If you want to move an anchor point without disturbing the contents of the layer you would use the “pan behind” tool. It looks like a square with arrows pointing inward.
AE Exercise #4
Create an animation of a circle orbited by other circles (planets, suns, marbles, whatever you’d like). Use easing to make this motion non linear, and imitate a given behavior (gravity, bouncing, etc). At some point in the animation, make the central object(s) move. The orbiting bodies should move along with it (via parenting). Please use creativity to do something like multiple marbles hitting each other, multiple “solar systems” or the like. It should be 10 seconds long.Export this as an .mp4 for next week 02/23/2023
Quick Hits
Things I will explain quickly in class. They may not relevant to everyone but may be of use to you to know what they are called.Continuous Rasterization︎︎︎
This is the button that looks like a sun that should be active on compositions or layers from Adobe Illustrator. This allows vector layers to be “continuously rasterized” when zoomed into and thus not lose resolution. This button also performs a function known as “collapsing transformations” that is a bit complex to go into. If you experience anything unusual when trying to simply Zoom into a vectorized layer, it probably has to do with this.
Motion along a path and orientation︎︎︎
Key frame paths can have handles added to them like paths in illustrator, they can be curved and the like. If you do this you can also orient your content along a path. This is how.
You may have to adjust the path if the rotation is “jerky” but it will prevent you from having to do a ton of rotation key framing.
3D + Cameras︎︎︎
We will get into this specifically, but this is a great way to add production value and complexity, though it is more taxing on your processor. This requires you to add an actual “camera” object and move it through the scene. Here are a couple of great tutorials for now.
Puppet Tool︎︎︎
This allows you to take a piece of content and add “pins” that can be keyframes. It can look janky if done hastily but if you do it right it can look great.
︎Back DMD 2