Warm-Up no.02, Lighting Things Up!
The skeleton
from adafruit_circuitplayground import cp
import time

while True:
You might want to just save this in a separate file that you copy/paste from, or try to type it out from scratch such that you just memorize it. All it does is import the code we need specific to the CPX board, and the Python code we need to do stuff with time.
“while True:” simply gives us our loop so that the code continues executing (try the next example without this to see what happens). Everything indented after it is part of our loop.
Note that in Mu, if you don’t do anything with “import.time” you will receive a warning that you have no time related code. This is fine, Mu is just trying to help you optimize your code.
Light it up
http://youtube.com/watch?v=lDdX6meXcY4
Now we want to do stuff. The most common thing to do is light up lights. The lights used on this board are proprietary RGB LED’s called neopixels. All this means is that they are made by Lady Ada/Adafruit and they can light up (LED ︎︎︎ Light Emitting Diode) and there are three small LED’s within the structure to create the impression of being able to emit multiple colors.
Here's how to light up all the neopixels
from adafruit_circuitplayground import cp
import time

while True:
	cp.pixels.fill((255,255,255))
All we’re adding is one line: cp.pixels.fill((255,255,255)). You should remember seeing this before. If you’re wondering the terminology around this stuff, when we have a bunch of periods like this we are accessing an object. The subsequent periods are members of that object which may be other objects, functions or variables.
- “cp” means we want to do something with the Circuit Playground that the import statement allows us to acess to.
- “pixels” means we want to do something with the neopixels; in this case all of them.
- “fill()” is a function that allows us assign a color to all the neopixels; ie “fill” them with a color.
- “(255, 255, 255)” is the color that we want to fill the neopixels with, we need three numbers in a range from 0 - 255. (0, 0, 0) will be the same as turning them off, and the values go in order of R, G, B. When values have parentheses around them like this; it is called a tuple. This is not disssimlar to a list or an array you may have seen in other languages (which also exist in Python). It just allows us to have one variable with multiple values for R, G, and B separately.
separate pixels
from adafruit_circuitplayground import cp
import time

while True:
  cp.pixels[0] = (255, 255, 255)
For whatever reason, when you light up a neopixel individually you need to use this syntax. “pixels” is an array of 10 neopixels which we can access individually with the brackets. This is how arrays and tuples are accessed in many programming languages. Note that the first neopixel is 0 rather than 1. So we go from 0 through 9. Setting that equal to a tuple with a color, we are able to light up an individual neopixel. This is a concept called zero indexing
Using Time
time, and more specifically, time.sleep() allows us to wait a fixed amount of time. This fixed amount of time is a fraction of a second, so time.sleep(0.50) would wait half a second. Here's an example.
from adafruit_circuitplayground import cp
import time

while True:
  cp.pixels.fill((255,255,255))
  time.sleep(0.2)
  cp.pixels.fill((0,0,0))
  time.sleep(0.2)
Things we talked about in class (08/25/2025)
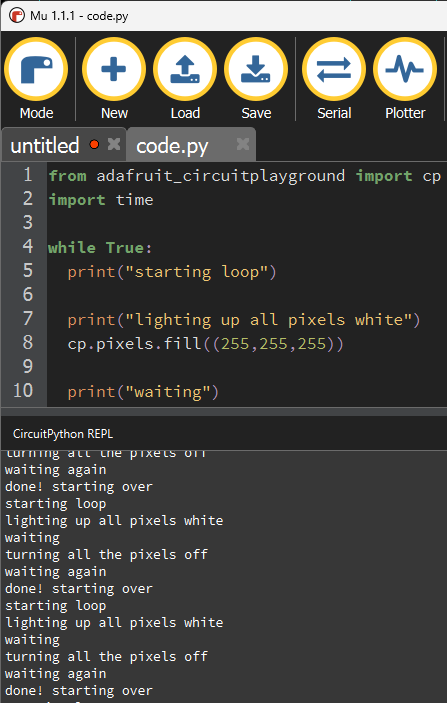
We talked about the following things in class, print statements and variables. If you'd like to actually see statements in the serial console in mu, you'd need to use the print command. Here's an example:
# imports
from adafruit_circuitplayground import cp
import time

#main loooooooooooooooooooop
while True:
  """
  this code has many print statements
  so that we can make sure each bit of
  code is reached. This technique will
  become more important later.
  """

  print("starting loop")

  print("lighting up all pixels white")
  cp.pixels.fill((255,255,255))

  print("waiting")
  time.sleep(0.2)

  print("turning all the pixels off")
  cp.pixels.fill((0,0,0))

  print("waiting again")
  time.sleep(0.2)

  print("done! starting over")
when you run this in Mu, you should see the following in the serial console:
The other thing we talked about was variables. Variables have many uses, one way that is fairly common to use them is as a kind of "configuration" or setting of options before your code runs, here's some code that repeats code in different ways but uses a variable to change the pixel color (please note we'll find a less tedious way to type this out next class).
Try copying the code below and changing the values of color and wait time and seeing what happens.
# imports
from adafruit_circuitplayground import cp
import time

# wait time is a variable
# change it to set how long we wait between
# turning on and off the neopixel
wait_time = 0.2


# color is what is called a "tuple" this just
# means we are saving multiple numbers at once
# this is just what it is called when we use
# paranthesis with multiple numbers.
# When we change this, it will change
# the color for the pixel when it is turned on

color = (255,0,255)
# main loop
# -------------------------------
while True:
  cp.pixels[0] = color
  time.sleep(wait_time)
  cp.pixels[0] = (0,0,0)

  cp.pixels[1] = color
  time.sleep(wait_time)
  cp.pixels[1] = (0,0,0)

  cp.pixels[2] = color
  time.sleep(wait_time)
  cp.pixels[2] = (0,0,0)

  cp.pixels[3] = color
  time.sleep(wait_time)
  cp.pixels[3] = (0,0,0)

  cp.pixels[4] = color
  time.sleep(wait_time)
  cp.pixels[4] = (0,0,0)

  cp.pixels[5] = color
  time.sleep(wait_time)
  cp.pixels[5] = (0,0,0)

  cp.pixels[6] = color
  time.sleep(wait_time)
  cp.pixels[6] = (0,0,0)

  cp.pixels[7] = color
  time.sleep(wait_time)
  cp.pixels[7] = (0,0,0)

  cp.pixels[8] = color
  time.sleep(wait_time)
  cp.pixels[8] = (0,0,0)

  cp.pixels[9] = color
  time.sleep(wait_time)
  cp.pixels[9] = (0,0,0)
# -------------------------------